

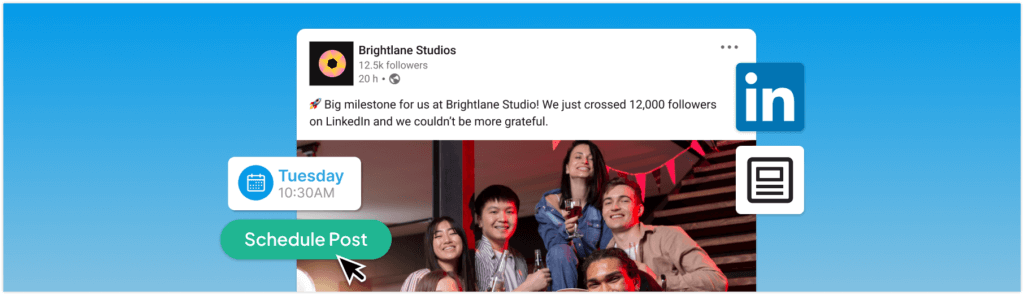
Quick answer: To schedule a LinkedIn post, write your post, add your media or link, select the schedule option, choose a date and time, then confirm so it publishes automatically. You can do this with LinkedIn’s built in scheduler or with a scheduling tool like Hopper HQ.
In today’s fast-paced professional landscape, maintaining a consistent presence on LinkedIn is crucial for building authority, networking, establishing thought leadership, and driving business growth. But who has time to log in every day to post content? That’s where scheduling comes in. Learning how to schedule LinkedIn posts can save you hours each week, allowing you to plan ahead, post at optimal times and simply focus on growing your business or career.
Whether you’re a service-based business owner like a coach or consultant, a small e-commerce founder, a creative freelancer, or a social media manager juggling multiple accounts, this guide will walk you through everything you need to know. We’ll cover native LinkedIn post scheduler, its limitations, and why a third-party LinkedIn scheduling tool like Hopper HQ might be the best way to streamline your workflow. By the end, you’ll be equipped to schedule LinkedIn posts in advance and maintain a steady stream of engaging content without the daily hassle.
Let’s dive in.
Why Schedule LinkedIn Posts?
Before we get into the how-to, it’s worth understanding the benefits of LinkedIn content scheduling. LinkedIn has over 1 billion users worldwide, and consistent posting is key to visibility. Recent analyses show that consistent posting on LinkedIn correlates with higher reach and engagement. But life gets busy, dotted with client meetings, product launches, and seemingly endless creative brainstorming sessions. Scheduling ensures your content goes live even when you’re offline.
Key advantages include:
- Time savings: Batch-create content once a week or month instead of daily posting.
- Consistency: Maintain a regular posting rhythm to build audience trust and algorithm favor.
- Optimal timing: Post during peak hours (e.g., Tuesday-Thursday, 8-10AM or 12-2PM) when your audience is most active, potentially boosting reach.
- Strategic planning: Align posts with marketing campaigns, holidays, or industry events.
For small businesses and freelancers, this means more time for client work or innovation. Social media managers can handle multiple clients efficiently. Ultimately, scheduling LinkedIn posts helps you stay top-of-mind without overwhelming your schedule.
Option 1: Using LinkedIn’s Native Scheduler
LinkedIn introduced its built-in scheduler in 2022, and is available for both personal profiles and company pages, as of 2026. It’s free and straightforward, making it a good starting point for beginners. However, it’s limited in features compared to dedicated tools.
Step-by-Step Guide to Schedule LinkedIn Posts Natively on Desktop
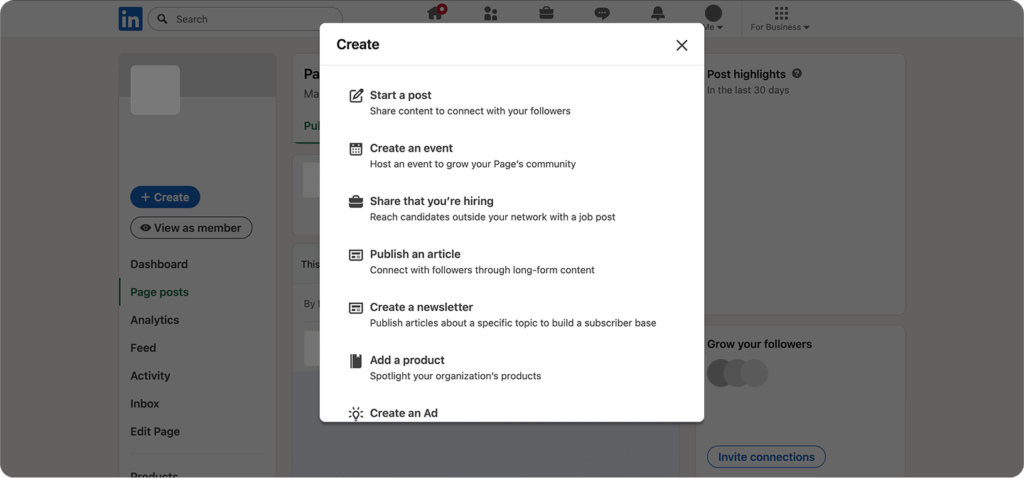
- Login to LinkedIn: Head to your linkedIn homepage and click “Start a post” at the top of the feed.
- Create Your Content: Write your post in the “What do you want to talk about?” field. Add images, videos, documents, or polls to make it engaging. Keep it professional yet conversational. LinkedIn favors value-driven content.
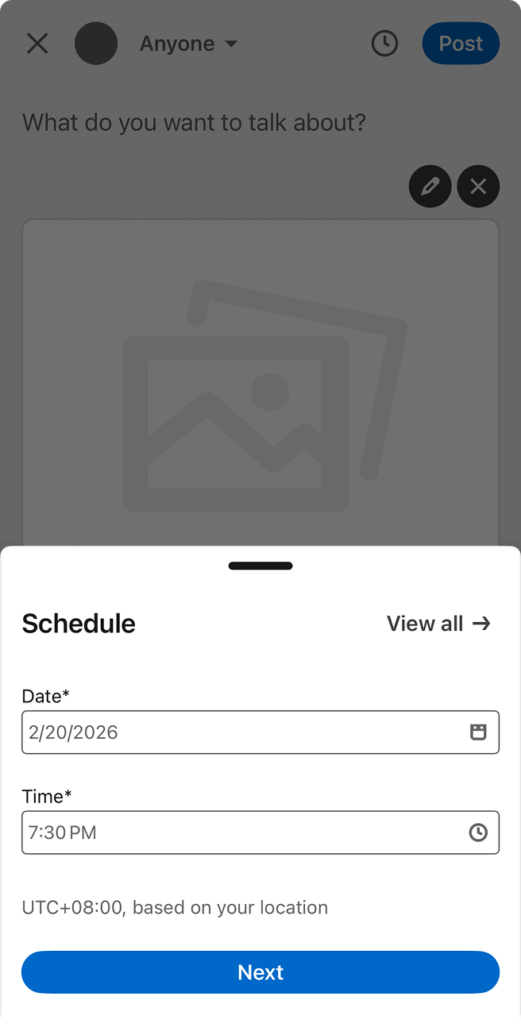
- Access the Scheduler: Instead of clicking “Post,” look for the clock icon (it says “Schedule for later”) in the lower-right corner of the post composer.
- Set Date and Time: In the pop-up, select a date (up to 3 months ahead) and time. Times are in 30-minute increments, but you can enter exact minutes. The minimum is typically 10 minutes from now to avoid spam filters.
- Review and Schedule: Double-check your post for typos or formatting issues. Click “Schedule” to confirm. Your post will appear in the “Scheduled” section under your activity.

Step-by-Step Guide to Schedule LinkedIn Posts Natively on Mobile (iOS/Android)
The process is similar on the LinkedIn app:
- Open the App: Tap the “+” icon or “Post” button from your home feed.
- Compose the Post: Add text, media, and any hashtags or mentions.
- Tap the Clock Icon: It’s located next to the “Post” button.
- Choose the Date and Time: Select from the calendar and time picker (up to 3 months ahead).

Pros and Cons of Native LinkedIn Scheduling
Pros
- Free and integrated: No extra sign-ups.
- Simple for occasional users.
- Supports most post types (text, images, up to 3GB files).
Cons
- No Bulk Uploading: You must schedule one post at a time.
- Limited Analytics: You can’t easily track performance or reschedule in bulk.
- Potential Engagement Dip: Some experts note that natively scheduled posts may see lower reach due to algorithm quirks.
- No Cross-Platform Posting: If you manage other social channels, you’ll need separate tools.
- Time Zone Issues: Schedules are in UTC, which can confuse global users.
If you’re posting sporadically, this might suffice. But for professionals aiming for consistency, it’s often not enough.
Limitations of Native Scheduling and Why Consider Third-Party Tools
While LinkedIn’s tool is handy, it falls short for busy users. You can’t visually plan your content calendar, collaborate with teams, or auto-post across platforms. Plus, manual posting every time defeats the purpose of efficiency.
This is where third-party LinkedIn scheduling tools shine. They offer advanced features like bulk uploads, AI-assisted captions, analytics, and multi-account management. Among them, Hopper HQ stands out as a simple, visual solution designed for small businesses and creatives. No overwhelming dashboards or steep learning curves.
Option 2: Scheduling LinkedIn Posts with Hopper HQ
Hopper HQ is an all-in-one social media scheduler that supports LinkedIn alongside Instagram, Facebook, Twitter, TikTok, Pinterest, and more. Known for its ease of use and trusted by over 10,000 brands, Hopper HQ sets itself apart by offering an intuitive visual planner that lets you drag and drop posts, preview feeds, and automate everything without phone notifications or manual pushes.
A no-overwhelm too, Hopper HQ is perfect for service-based pros, e-commerce founders, and freelancers who want to schedule LinkedIn posts efficiently while growing their audience.
Step-by-Step Guide to Schedule LinkedIn Posts with Hopper HQ
- Sign Up and Connect Accounts: Create a free trial account on Hopper HQ’s website. Connect your LinkedIn Profile or company page via secure API. It’s quick and doesn’t require sharing passwords.
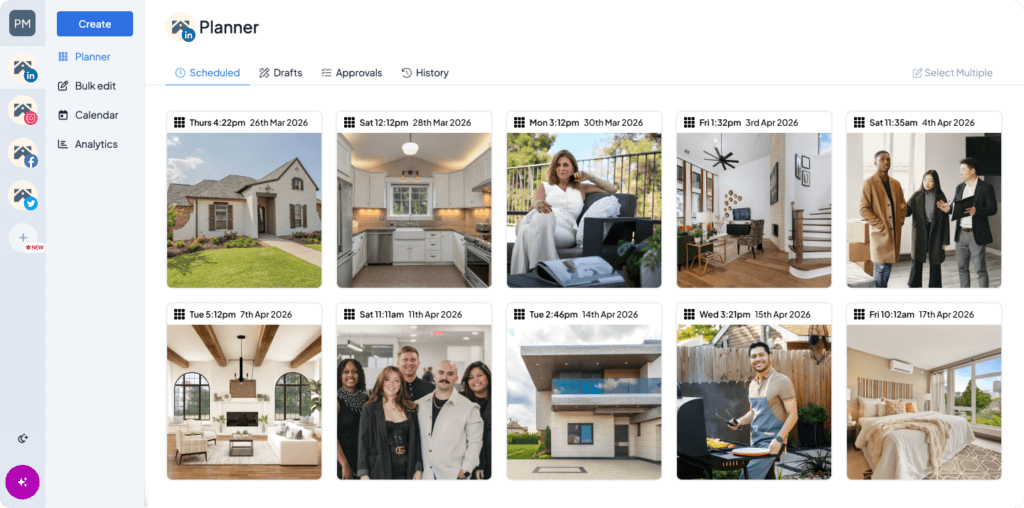
- Access the Dashboard: Log in to see your visual calendar. It’s intuitive, showing a grid or list view of upcoming posts across all connected platforms.
- Create a Post: Click “Create Post” or upload via bulk CSV importer for multiple posts. Add text, images, videos, or carousels. Use built-in AI to generate captions and hashtags tailored to LinkedIn’s professional tone.
- Customize for LinkedIn: Select LinkedIn as the platform (or multu-post to others). Edit first comments, add links, or tag connections.
- Schedule It: Drag the post to your desired date/time on the calendar. Hopper HQ handles autoposting. No need to be online. Set recurring posts if needed.
- Preview and Collaborate: Use the grid planner to visualize how posts fit your content strategy. Invite team members for approvals.
- Analyze and optimize: After posting, check analytics for engagement, best times, and performance insights to refine future schedules.

With Hopper HQ, you can schedule LinkedIn posts in advance for weeks or months, freeing up time for client work or creativity.
Benefits of Hopper HQ Over Native Scheduling
- Visual Planning: See your entire content calendar at a glance. No more spreadsheets!
- Bulk and Automation: Upload 50+ posts at once, with AI tools for quick creation.
- Multi-Platform Efficiency: Manage LinkedIn alongside other channels from one spot.
- Team Collaboration: Ideal for social media managers handling client accounts.
- Advanced Features: Hashtag research, Link-in-bio tools, and detailed analytics.
- No Engagement Penalty: Posts via API, mimicking manual posting for better reach.
Native vs. Third-Party: A Quick Comparison
| Feature | LinkedIn Native Scheduler | Other Third-Party Tools | Hopper HQ |
| Cost | Free | Varies widely ($5-$6/channel for entry-level like Buffer; $99/mo base for Hootsuite; $199+/seat for Sprout social; scales with users/channels | Per-account pricing; starts ~$5/mo (Grow) for one account; lower with annual/volume discounts or Scale at $10/mo for unlimited accounts; team features included on paid plans. |
| Bulk Scheduling | No | Yes (limits vary; e.g., Buffer up to 100CSV, Hootsuite higher on premium) | Yes (CSV importer for hundreds of posts at once) |
| Visual Calendar/Planner | No | Varies (some have calendars; others more list-based) | Yes (drag-and-drop grid + calendar view; highly visual and intuitive) |
| Multi-Platform Support | No | Yes (most support 5-10+ platforms) | Yes (Instagram, Facebook, LinkedIN, TikTok, Pinterest, YouTube, X, etc.) |
| Advanced Analytics | Basic (views, engagement) | Detailed (best times, trends, cross-platform reports; some require higher tiers) | Solid engagement insights + platform-specific (strong on visuals like Instagram) |
| Team Collaboration | No | Often included (approval workflows; extra cost for more users in many cases) | Yes (unlimited team members; approvals and shared access in base plan) |
| Max Schedule Ahead | 3 months | Unlimited or very extended | Unlimited |
| Autoposting Reliability | High (native) | High (API-based; occasional quirks on some platforms) | High (full autoposting; no reminders needed; reliable for LinkedIn images/videos) |
| Ease of Use/No Overwhelm | Simple but limited | Varies (some feel complex with many features) | Excellent (clean, visual-first interface designed for simplicity) |
| Best For | Occasional solo posters | Larger teams or advanced needs (ads, heavy reporting) | Small businesses, creatives, freelancers, and teams wanting visual planning without complexity |
Tips for Effective LinkedIn Content Scheduling
To maximize your efforts:
- Post at Peak Times: Aim for mid-week mornings based on your audience’s time zone.
- Mix Content Types: Alternative articles, polls, videos, and thought leadership pieces.
- Use Hashtags Wisely: 3-5 relevant ones per post, like #LinkedInTips or #BusinessGrowth
- Engage Post-Publish: Respond to comments within 24 hours to boost algorithm visibility.
- Track Performance: Use tools like Hopper HQ’s analytics to iterate such as, what resonates with your audience?
- Avoid Over-Posting: 2-5 times per week is ideal to prevent fatigue.
- Compliance Check: Ensure content aligns with LinkedIn’s policies. No spam or misleading info.
By allowing these, your LinkedIn content scheduling strategy will drive real results, like increased leads or collaboration.
Conclusion: Take Control of Your LinkedIn Presence
Mastering how to schedule LinkedIn posts is a game-changer for busy professionals. While the native LinkedIn post scheduler is a solid entry point, tools like Hopper HQ elevate your strategy with simplicity, visuals, and powerful features without getting overwhelmed.
Ready to save time and post consistently? Sign up for Hopper HQ’s free trial today and experience effortless LinkedIn scheduling. It’s time to start owning your feed.