How To Create a Facebook Business Page in 6 Steps

Learn how to create a Facebook business page to establish your presence on the platform.
Having a business page lets you promote your products/services to a wider audience. A business also serves as a channel for prospects to learn more about your business.
Overall, brand owners like you can leverage a business page on Facebook in ways. But to get started, how do you create a business page on Facebook the right way?
In today’s article, we will be diving into the nitty-gritty of how to make a Facebook business page that not only stands out but also drives results.
What Is a Facebook Business Page?
A Facebook business page is a dedicated profile for businesses, public figures, and organizations to promote themselves. This page allows you to showcase your brand and connect with new customers or fans.
Facebook’s business page, originally known as Fan Pages, was launched in 2007. Initially, it was designed to allow businesses, celebrities, and organizations to establish a presence on the platform distinct from personal profiles.
Today, it has grown into a centralized hub where your potential customers can discover you, learn about what you offer, and engage with your brand. Not only that, it’s equipped with unique features that help you promote your brands.
You can run Facebook ads, open a Facebook Shop, and use other Facebook Commerce and promotional tools that you can’t access on your personal account.
How to Create a Facebook Business Page in 6 Steps
Now that you know what a Facebook business page is, let’s get into how to make a Facebook Business page that will represent your business in the best light.
Here is a step-by-step process that will guide you on how to create a business page from scratch:
Step 1: Choose a Personal Facebook Account
To create a business page, you must have a personal Facebook account.
This is because your account acts as a manager for your business page – a role known as the Page administrator.
You can choose to use your existing personal Facebook account. However, it’s advisable to create a new account especially if you want to keep your business and personal profile separate.
Once you’ve picked your account of choice, Log in with your account, and click on the Menu icon on the left.
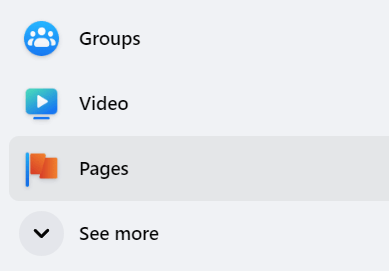
On the left-hand side of the screen, click on the Pages tab. Below Your Pages and profiles, you’ll see a button labeled Create new Page. Click this to begin the process.

Step 2: Pick a Name
The next step is to choose a name for your business page. This is a very important stage because your name of choice will be used to identify and search for your business.
When choosing a name, remember to opt for a name that’s consistent with your brand identity. Your name should be easy to remember and accurately captures what your brand is about. After picking a name, you will also be asked to choose a category that best represents your business.
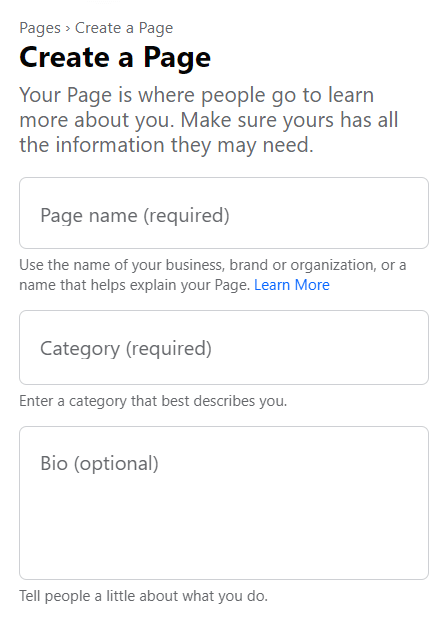
Step 3: Complete Your Facebook Business Page Information
Provide a detailed and compelling description of your brand. When writing your description, make sure you highlight your value proposition and key offerings.
You should also note that Facebook has a character limit of 255 characters. This means your description needs to be concise without leaving out any useful information.
Aside from writing a good description, you should fill in your contact information as well. You can add your website URL, email address, and phone number (which is optional) to make it easy for customers to connect with you.
Lastly, upload a profile and cover photos. These visuals are the first impression you make, so choose high-quality images that represent your brand. Make sure your pictures are also optimized for Facebook’s dimensions (profile photo is 170 x 170 pixels while cover photo is 820 x 312 pixels).

Step 4: Customize Your Facebook Page
Facebook offers various templates tailored to different business types, such as “Local Business” or “Restaurant.” Choose the one that best suits your needs and provides relevant features. Each template comes with pre-set tabs, but you can customize them to fit your brand’s aesthetics.
You can also add a call to action button to encourage your followers to take the next step. This can be to visit your website, contact you, or make a purchase. Your call to action will be dictated by your type of business and what’s most important to your brand and customers.
Step 5: Optimize Your Page
The next step is to choose a custom username (e.g., @yourbusinessname) for your page. When picking a username, make sure you choose a username that’s consistent with your brand. It should also be memorable and easy to remember.
Another way to optimize your Facebook page is to integrate it with WhatsApp. This way, customers who don’t want to reach you on Facebook Messenger have the option to do so on WhatsApp.
Step 6: Promote Your Business Page
Now that you’re done creating your business page, it’s time to start promoting it. There are different ways to approach this, you can begin to invite friends and contacts to like your page.
Once you have some followers, creating engaging content is another way to keep your followers engaged.
You can also explore Facebook’s advertising options to reach a wider audience and target specific demographics or interests. Facebook ads help you boost your visibility by running targeted ads. Advertising on Facebook also allows you to reach specific demographics, ensuring your content reaches the right audience.
How to Add an Admin to a Facebook Page
Whether you’re bringing on a team member, collaborating with a specialist, or welcoming a dedicated social media expert, this section will provide everything you need to add administrators to your Facebook page.
In this section, we’ll be looking at how to add an admin both on the desktop and mobile versions:
Adding an Admin on Desktop
Here is a step-by-step process of how to add an admin on the desktop:
- Navigate to Your Page: Log in to Facebook and then go to the specific page you want to add an admin to. You can access your page either from your personal profile or through the Pages Manager tool.
- Access Page Settings: Go to the “Settings” option on your Page.
- Manage Page Roles: Within the Settings menu, look for a section dedicated to “Page Roles” or “People and Roles.”
- Assign a New Role: This section gives you two options: “Assign a new Page role” or “Existing Page Roles.” Choose the former to add a new admin.
- Choose Admin Role: Start typing the name or email address of the person you want to add in the designated field. Facebook will suggest matching profiles as you type. Select the correct person from the list.
- Send Invitation: By default, the suggested role is usually “Editor.” Click on the dropdown menu next to their name and select “Admin.” Finally, click the “Add” button to send the invitation. This person will receive a notification on Facebook and need to accept it to become an admin.
Adding an Admin on Mobile
Here’s a step-by-step guide to how to add an admin on mobile:
- Open Your Page App: Launch your Facebook Pages app on your phone.
- Select Your Page: Within the app, navigate to and choose the specific Page you want to add an admin to.
- Access Menu: Look for the menu icon (usually three horizontal lines) on your screen, typically located in the top right corner.
- Go to Settings: Once you open the menu, scroll down and tap the “Settings” option.
Manage Page Roles: Similar to the desktop version, search for “Page Roles” or “People and Roles” within the Settings menu. - Add Person to Page: Locate and tap the option “Add Person to Page” which allows you to invite someone new.
- Find New Admin: Start typing the name or email address of the person you want to add in the search bar. Choose their profile from the displayed results.
- Assign Admin Role: Under their name, tap on the “Page Roles” section and select “Admin” from the available options.
- Send Invitation: Finally, tap the “Send” button to send the invitation. They will receive a notification on their Facebook app and need to accept it to become an admin.
How to connect Instagram to a Facebook business page
To connect your Instagram to your Facebook page, you need to have an Instagram business profile. If you don’t already have a business account, you can switch by going to Settings in your Instagram app. Click on Account and then hit Switch to Professional Account.
In addition to having a business Instagram account, you also need admin access to the Facebook business page you want to connect to the Instagram account.
Connecting Instagram to Facebook on Desktop
- Facebook Page Settings: Log in to Facebook and access your desired business page’s settings. Click “Settings” at the top right corner of your Page.
- Linked Accounts: On the left-hand menu under “Business Integrations,” click “Instagram.”
- Connect Account: Click “Connect Account” if it’s not already linked. This will open a new window.
- Log in to Instagram: Enter your Instagram username and password to authorize the connection. You may be asked to choose which Facebook Page to connect to if you manage multiple ones.
- Permissions: Choose which aspects of your Instagram account you want to connect. Options include sharing Instagram posts to your Facebook Page, receiving messages in your Facebook inbox, and automatically cross-posting stories.
- Confirmation: Click “Next” or “Confirm” to finalize the connection.
Connecting Instagram to Facebook on Mobile
- Instagram App: Open the Instagram app and go to your profile.
- Edit Profile: Tap “Edit Profile” under your bio.
- Public Business Information: Look for the “Public Business Information” section and tap “Page.”
- Choose Facebook Page: Select the Facebook Page you want to connect from the list or create a new one.
- Log in to Facebook: Enter your Facebook login information if prompted.
- Permissions: Choose the desired permissions as described above.
- Confirmation: Tap “Connect” or “Done” to confirm the connection.
Remember, once connected, you can manage your Instagram posts, schedule content, and track performance directly from your Facebook Page, streamlining your social media workflow and maximizing your reach.
How to Delete a Facebook Business Page
Deleting your page is permanent. Once it’s gone, you can’t get it back. Therefore, it’s advisable to double-check if you want to deactivate it temporarily instead (which hides it but lets you bring it back later). You should also make sure you have a data backup of your page if you’re considering deleting it.
If you’re sure you want to delete your business page, here’s a quick walkthrough on how to get that done:
- Log in to Facebook and go to your business page
- Navigate to the Settings tab at the top right corner of your page and click on it.
- Go to General and scroll down until you see “Remove Page”.
- Click on Remove Page and you’ll have two options:
- Delete Your Page: This hides your page for 14 days a grace period just in case you change your mind and want to restore it.
- Permanently Delete: As the name implies, all your page content will be gone after 14 days.
Confirm your choice, enter your password, and click Delete Page again to confirm.
5 Tips for Running a Successful Facebook Business Page
Below are tips you can use to build a successful Facebook business page:
1) Know Your Audience
By understanding your audience’s demographics, interests, needs, and challenges, you can tailor your content to resonate with them. This ensures you’re offering relevant information, entertainment, or solutions that truly matter to them. Irrelevant content quickly leads to unengaged followers.
Knowing your audience fuels growth and conversion. By understanding their pain points, desires, and buying habits, you can create content that drives them toward your desired outcome, whether it’s brand awareness, website traffic, lead generation, or sales.
To get a better understanding of your audience, ask yourself the following questions:
What do your ideal customers like to do?
Where do they find information?
What type of content do they consume?
What are some of their main pain points?
What’s their age, location, and income level?
Use this information you gathered to develop detailed profiles of your buyer persona. Having a buyer persona helps you craft targeted messaging that connects with your audience. You’ll be in a better position to know when is the best time to post on Facebook.
2) Post Consistently
To maintain a successful Facebook page, you need to ensure you’re posting consistently. A good way to establish this is to create a content calendar and plan for content ideas in advance.
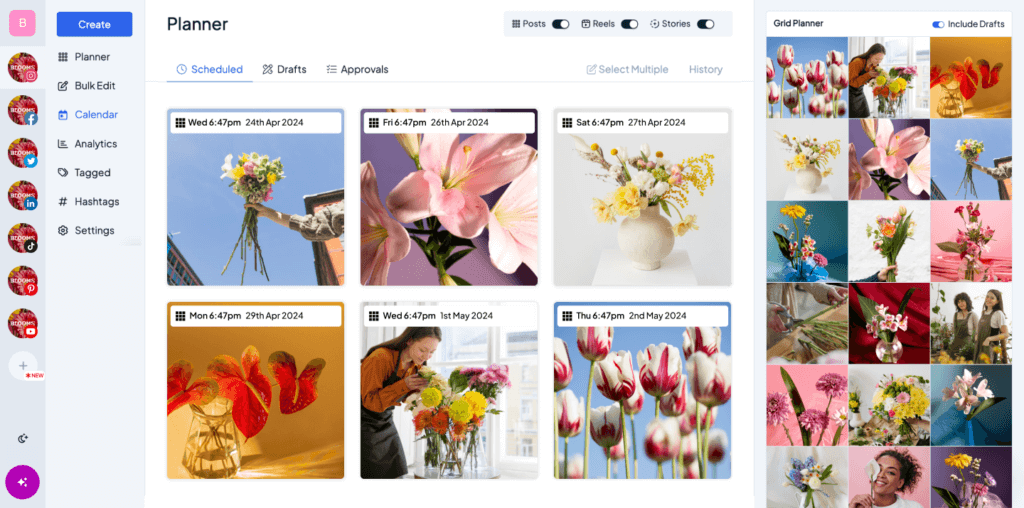
You can leverage a tool like HopperHQ to schedule Facebook posts, streamline your workflow, and ensure consistent content delivery. By adopting these strategies, you’ll engage your audience, maintain their interest, and ultimately achieve your social media goals.
3) Engaging with Your Audience
Respond to comments and messages promptly. Show your audience you care about their feedback and opinions. You should ask questions and encourage discussions with your followers. Asking questions creates opportunities to interact with them and know how best you can serve them.
There are many ways to engage with your audience on Facebook. You can run polls, and surveys or host Q&A sessions to foster a sense of community.
4) Prioritize Quality Content Over Quantity
When creating content, ensure that you prioritize quality over quantity. Every post on your page should offer something useful, informative, or entertaining to your audience. You can share content that educates your audience, industry insights, and useful information.
You should also consider using high-quality visuals and graphic elements to make your content visually appealing.
5) Advertise for a Wider Reach
Facebook Ads allow you to target specific demographics, interests, behaviors, and even locations with pinpoint accuracy. This ensures your content reaches the exact audience most likely to resonate with your brand.
Facebook also provides detailed analytics and insights into your ad performance. You can track clicks, impressions, conversions, and engagement metrics to understand what’s working and what’s not. This data-driven approach empowers you to optimize your campaigns for maximum impact and return on investment.
Conclusion
Although making a Facebook business page is important, how you manage the page is far more important.
Ensuring that you create content that your audience cares about is vital for success. More importantly, you need to be sharing consistently is equally important. With the right strategy and tools at your disposal, you can leverage your Facebook business page to increase awareness and drive more customers to your brand.
Hopper HQ is packed with features that help you approach content creation and plan more strategically. Our software equips you with the features needed to plan, schedule, and create a content calendar. Try Hopper HQ planning and scheduling capabilities for free!
Take your social game further with Hopper HQ.
Plan, schedule and auto-post to every channel in one place. Free for 14 days, no card required.