How to Post on Instagram From Desktop (PC & Mac) in 2026

Yes, you can post on Instagram from a desktop in 2026. There are three ways to do it: the built-in Instagram web uploader on instagram.com, Meta Business Suite, or a scheduler like Hopper HQ that lets you plan and auto-publish weeks of content in one sitting.
This guide walks through all three, step by step, for both PC and Mac. It covers photos, videos, carousels, Reels, and Stories, plus how to schedule Instagram posts from your desktop so you never have to reach for your phone. Updated July 2026.
Can you post on Instagram from a desktop?
Yes. Instagram’s web version now fully supports posting from any desktop browser. No app required, no workarounds needed. It works on both PC and Mac.
You can post photos, videos, carousels, Reels, and Stories directly from instagram.com. The interface is intuitive, and the upload process is straightforward. Simply log in, click the Create button, and you’re ready to go.
This represents a major shift for Instagram. A few years ago, desktop posting was impossible without third-party tools. Today, the native desktop experience is fully built in and works smoothly across all major browsers.
Three ways to post on Instagram from desktop
There are three methods worth knowing. Pick the one that matches how often you post:
- Instagram.com (the web uploader): post one-off photos, videos, carousels, Reels, and Stories directly from your browser. Best for occasional posting.
- Meta Business Suite: Meta’s free desktop tool that lets you post and schedule to Instagram and Facebook from one place. Best if you already run Facebook Ads or use the Business Suite for messaging.
- Hopper HQ: a purpose-built Instagram scheduler for posting in bulk, planning a visual grid, and auto-publishing across Instagram, TikTok, LinkedIn, Facebook, and more. Best if you post consistently and want to batch a week or a month of content in one sitting.
The rest of this guide walks through each method, plus tips on Instagram post dimensions and how to keep your feed consistent when you plan ahead.
How to post on Instagram from your PC or Mac
With Instagram’s latest update, everyone can post from PC whether with Mac or Windows; therefore, allowing to upload Instagram posts from the web version of Instagram (Not the mobile app).
If you’re looking for a centralized solution to posting on several social media channels from your PC, consider giving Hopper HQ a try for free!
1) Visit the Instagram website and log in
Head to www.instagram.com and login to your account. If you haven’t created one yet, follow the sign-up instructions instead.
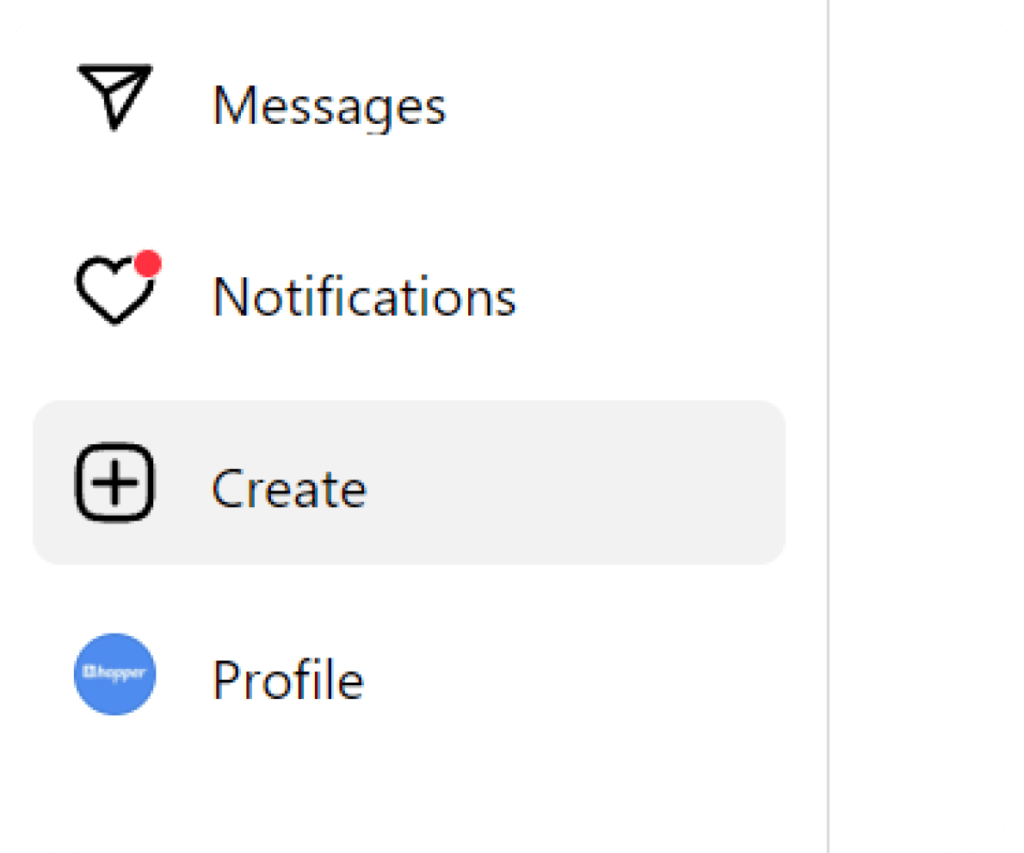
2) Once inside, click the + icon in the upper-right corner
Here, you can edit the photos, and add your caption, for instance. In addition to changing location, Alt text, and advanced settings.
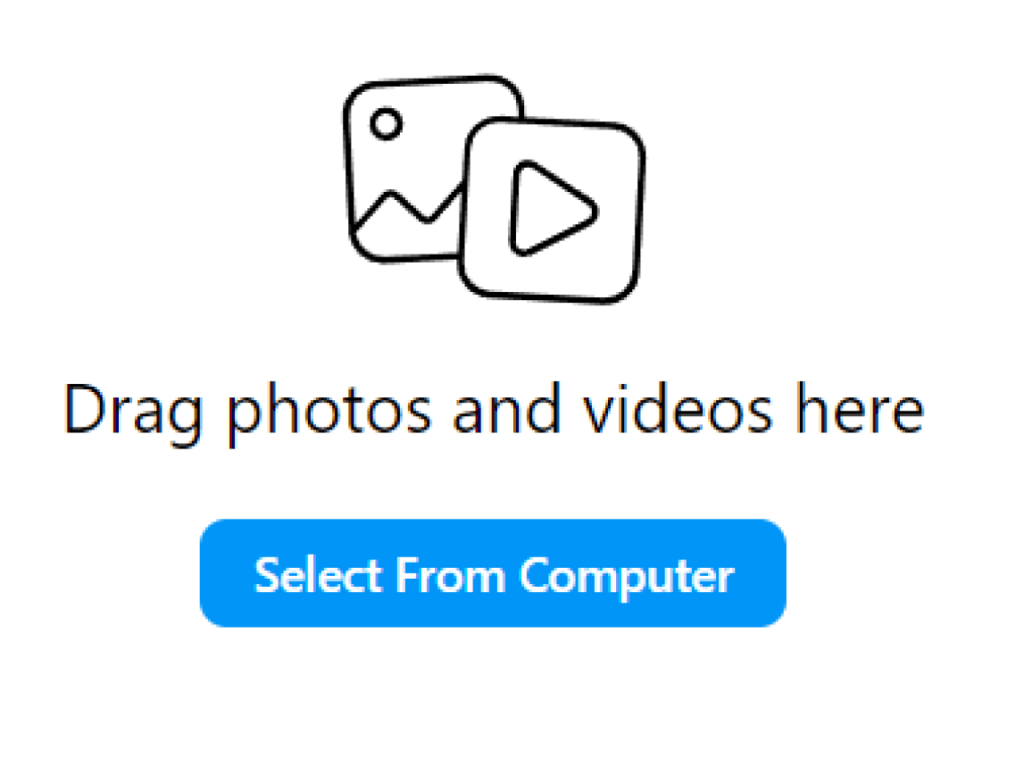
3) Select the content from your computer
You’ll have to select the content you wish to post from your computer. So, ensure that you’ve transferred any visuals if necessary or that they are reachable through the internet.
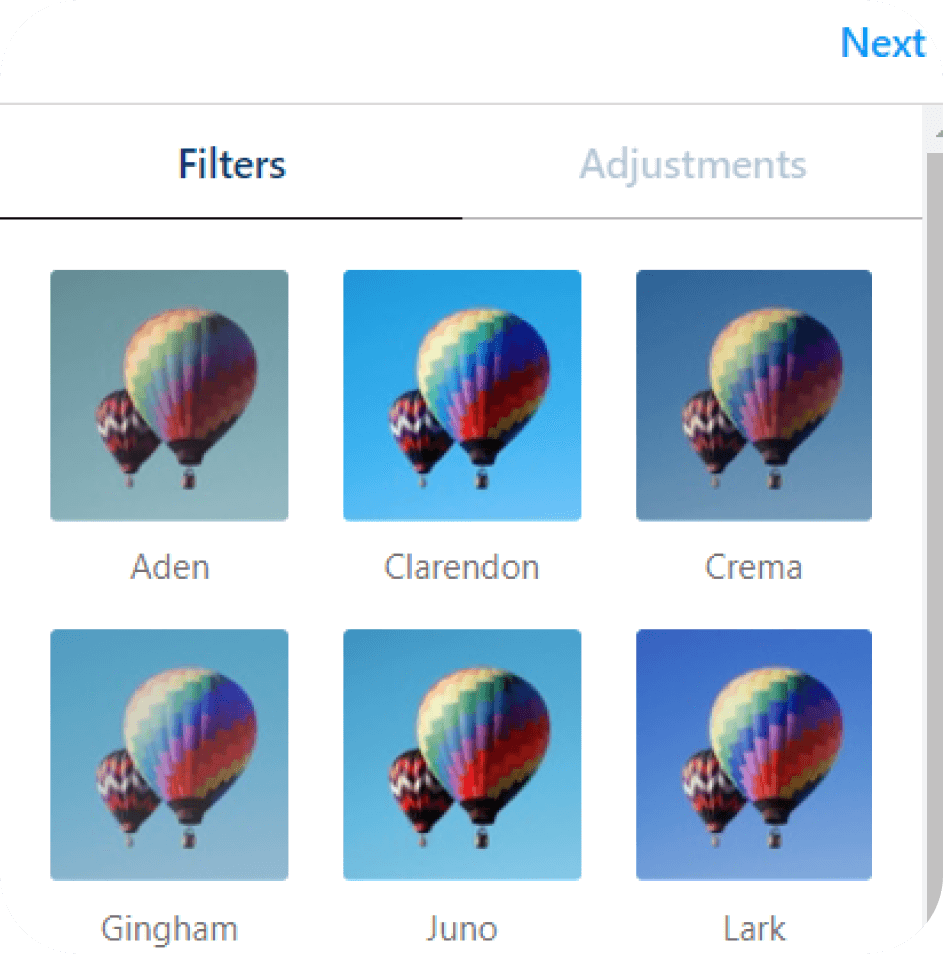
4) Edit the post and add any necessary details
You will first be asked if you’d like to crop the image or make the post a carousel. Then you can add filters or make adjustments to make your post extra appealing.
5) Add Captions and locations to your post
Lastly, make sure you added a captivating caption to engage your audience and if relevant, you can also tag the post geographically. You can use this Instagram caption generator to quickly create ideas for your posts.

6) Click Share and publish your post
Now, that everything is set, you can hit “share” which will make your post public to everyone! Make sure to check how your post looks on your grid.
This process works for photos, videos, carousels, and Reels. The steps are the same regardless of which content type you choose. Just select your content, write your caption, and publish.
How to post Instagram Stories from desktop
Instagram now supports Story creation and posting directly from your desktop browser. Here’s how:
- Go to instagram.com and log in.
- Click your profile picture in the Stories row, or look for the Story creation option.
- Upload a photo or video from your computer.
- Add text or stickers if you want. (Some advanced editing features are still more limited on desktop than mobile.)
- Click Share to post your Story.
For basic Stories, the native browser experience is simple and works well. If you’re creating complex Stories with lots of music, effects, or advanced stickers, you might prefer creating on mobile. But for straightforward Stories, desktop posting is perfectly fine.
How to post Reels on Instagram from a desktop computer
Reels use the same upload flow as a photo post. Follow steps 1–3 above (log in, hit the + icon, pick your video file), then handle the two Reel-specific bits below.
1) Crop the video and add extra clips (optional)
Instagram asks whether you’d like to crop your video or add more clips to create a Reel with multiple segments. Reels look best in 9:16 (1080 × 1920 px). If you’re not sure, our Instagram dimensions guide covers every format.
2) Add a cover photo and trim the video
Pick a cover photo that reads well as a static thumbnail on your grid. You can trim the start and end of the Reel here if you want a tighter edit.
3) Click Share and publish your Reel
Hit “Share”. Your Reel is live. If you want to plan a batch of Reels in advance rather than publishing one by one, you can schedule Instagram Reels with Hopper HQ.
How to post to Instagram via Meta Business Suite
Meta Business Suite is Meta’s free desktop tool for managing Instagram and Facebook Pages side by side. It’s a solid middle ground: more capable than the plain instagram.com uploader, more limited than a dedicated scheduler. Best fit: you already run Facebook Ads or use the Business Suite for messaging, and you want everything in one place.
You’ll need your Instagram account converted to a Business or Creator account, and connected to a Facebook Page you manage.
1) Open Meta Business Suite
Go to business.facebook.com in your browser and log in with the Facebook account that manages your Instagram Business Page.
2) Click Create post
In the left sidebar, click Create post (or Create story/Create Reel). In the post composer, tick the Instagram box in the “Select platforms” header so the post publishes to Instagram. Untick Facebook if you don’t want it cross-posted.
3) Add your media and caption
Drag in a photo or video (or upload from your computer), write your caption, add hashtags, and tag accounts. Meta Business Suite handles carousels, single images, videos, Stories, and Reels.
4) Publish or schedule
Click Publish to post immediately, or click the arrow next to it and choose Schedule post to pick a date and time up to 75 days out. Scheduled posts show up under Content > Scheduled where you can edit them before they go live.
What Meta Business Suite can’t do
- No visual grid preview: you can’t see how upcoming posts will look together on your feed.
- No bulk upload: you post one at a time.
- Instagram and Facebook only: no TikTok, LinkedIn, Pinterest, or YouTube.
- No team roles beyond Meta’s Business Manager permissions, which are heavy-handed for small teams.
If any of those matter, a purpose-built scheduler like Hopper HQ covers them from the same desktop workflow.
How to schedule Instagram posts from your desktop computer
Scheduling from desktop beats posting one photo at a time. You can batch your whole week in a single focused session, write better captions on a proper keyboard, see how your grid looks together, and let posts publish without any phone notifications pulling your attention.
Instagram’s native scheduler
If you have a Creator or Business account, Instagram’s native scheduler is available right on instagram.com. Create your post, then click Schedule instead of Share. Pick your date and time, and Instagram will publish it automatically. It’s basic but effective. You can schedule up to 75 days in advance.
While you could view Stories on the web version, creating and posting Stories directly from Instagram’s web interface was not a built-in feature. To upload Instagram Stories from your computer is a bit more complicated. You’ll need to use a Google Chrome web extension.
Scheduling with Hopper HQ
For more advanced scheduling, Hopper HQ lets you schedule multiple posts at once and manage them from a visual grid. Here’s what it adds beyond Instagram’s native option:
- Visual grid preview: See exactly how your posts will look on your feed before publishing.
- Bulk upload: Upload and schedule up to 50 posts in a single session.
- Auto-publish: Posts publish on schedule without pushing notifications to your phone.
- Multi-platform scheduling: Schedule Instagram, TikTok, Facebook, and LinkedIn from the same place.
- Free trial: try the Hopper HQ Instagram scheduler free for 14 days.
With Hopper HQ’s social media content calendar, you can plan your entire month, maintain aesthetic consistency across your feed, and stay organized. It’s designed for people who post consistently and want to work smarter, not harder.
Hopper HQ vs Instagram’s native desktop app
Here’s how the options compare:
| Feature | Instagram web (native) | Hopper HQ |
|---|---|---|
| Post photos and videos | Yes | Yes |
| Post Stories | Yes (limited editing) | Yes |
| Schedule posts | Yes (basic) | Yes (advanced) |
| Visual grid preview | No | Yes |
| Bulk upload | No | Yes (up to 50) |
| Multi-platform scheduling | No | Yes |
| Team collaboration | No | Yes |
| Cost | Free | Free trial |
But for this guide, we recommend using the Hopper HQ app, where you can seamlessly, create, schedule, and track all Instagram content types.
- Create an account on Hopper Hq
- Add your Instagram and Facebook account
- Click on Create and upload your story
- Add caption and hashtags
- Post story or schedule for later
How to Post on Instagram from PC with Hopper HQ
Whether you’re on a Mac or Windows PC, you can schedule and post on Instagram with ease using the Hopper HQ desktop app.
Hopper HQ provides a seamless Instagram for Mac and Windows experience, allowing you to visually plan and schedule your social media campaigns automatically with tailored insights, all from your computer. Scheduling your posts saves you precious time that you can use to focus on other important aspects of your growth.
Using an Instagram scheduler lets you:
- Prepare content as a team
- Schedule and autopost from your desktop
- Improve content quality
- Plan your social media calendar
- Leverage an Instagram Grid Planner
- Bulk Upload Instagram posts
- Track and Analyse your analytics
- Use the mobile app on the go
What’s even more exciting about using Hopper HQ is that you can publish your Instagram content across all your channels in just a few clicks. Which makes keeping a presence on social media even easier!
In case you experience a moment worth capturing, you can use the Hopper HQ Mobile app to post on the go!
1) Create an account at HopperHQ.com
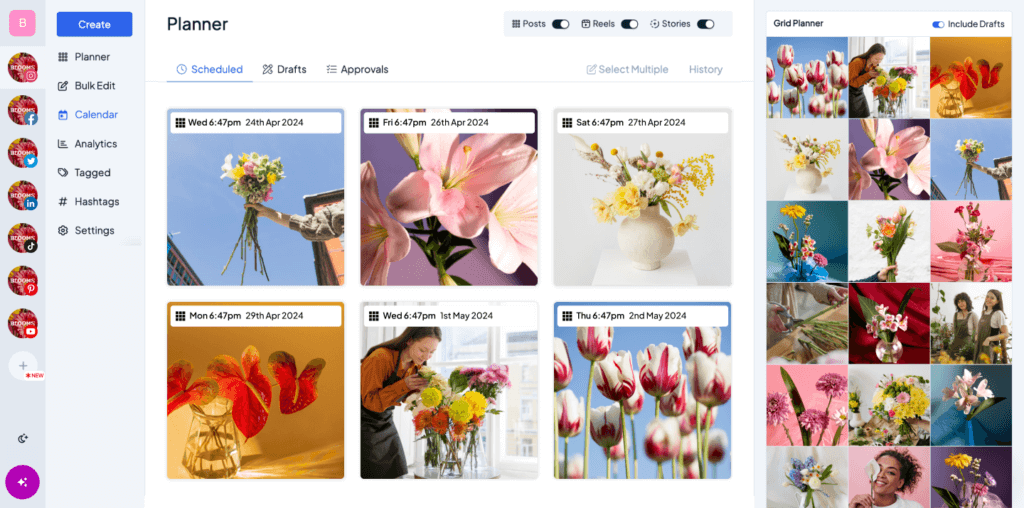
After logging in to your new account, you are greeted with a visual dashboard.

2) Upload your photos or videos
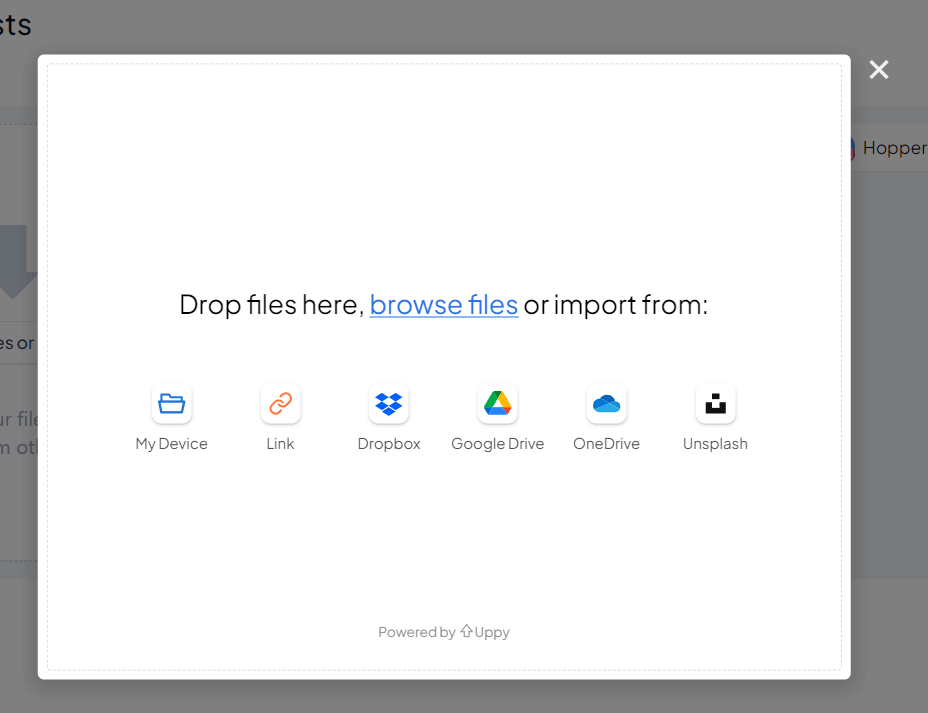
In the top-left corner, click “create” and you are taken to a window where you can upload 50 photos or video posts at once directly from your desktop browser in one swoop.
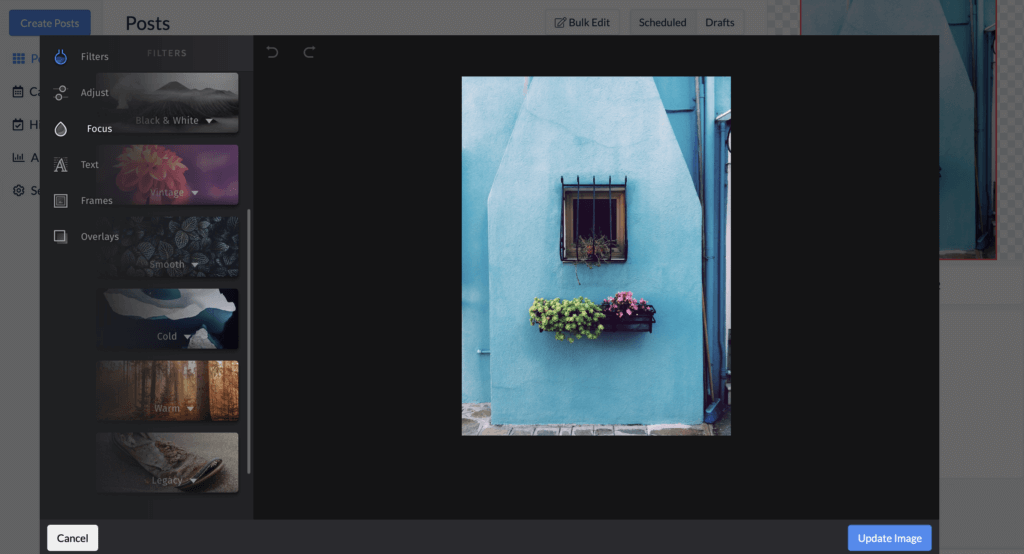
3) Edit your Images
Add frames, text, stickers, and more to get your images looking their best from your desktop with Hopper HQ.
If your images or videos are not in the correct Instagram size dimensions, you’ll get an alert letting you know. You may also want to use Hopper HQ’s AI dimensions adjuster.
4) Add Captions and other details
Once you’ve made your edits, you can write captions (including emojis) for all uploads, add hashtags using the hashtag explorer feature (where you can even create templates) and you also schedule the first comment.
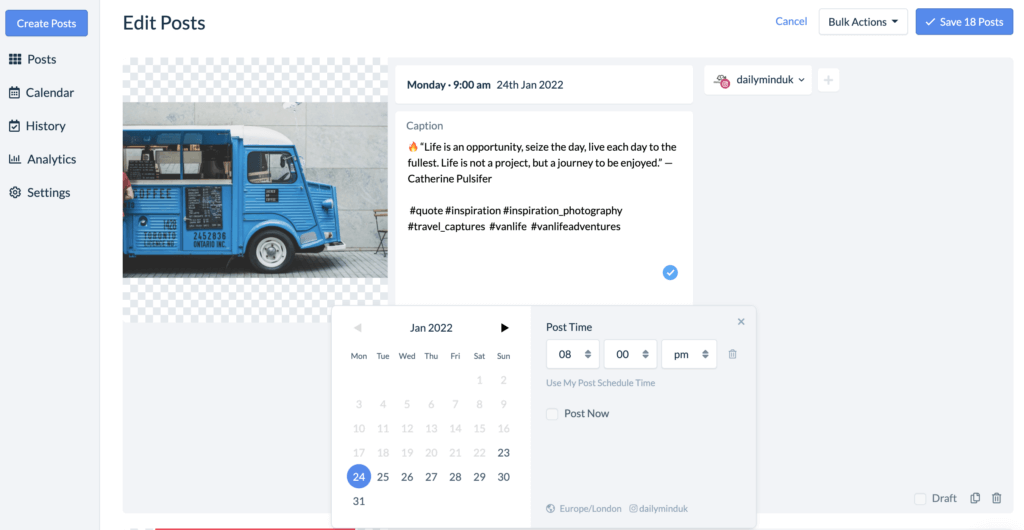
5) Publish your post for whenever
With Hopper HQ you can schedule your post for whatever time and date you prefer. You can choose to post straight away or select a specific time for it to be automatically posted onto your grid without needing to move a finger.
If you decide you want to publish the same post to another social network then, you can choose to send it to multiple platforms at the same time. This includes Instagram, Facebook, Twitter, LinkedIn, YouTube and even TikTok.
Hopper HQ vs the Instagram Desktop App?
The answer to the question “Which one is better?”, totally depends on what you’re looking for and need. If you’re looking at how to post on Instagram from a PC as a one-time situation, using the Instagram Desktop app will be enough.
However, if you’d like to frequently post on Instagram and vary on the type of content (post story or reel), you may want to consider Hopper HQ.
- You can only post on Instagram using the Desktop App: With Hopper HQ you can post the same content onto your different channels. Saving you time to focus on analytics and content creation.
- With Hopper HQ you can visually plan your post with a Grid Planner. Create a visually appealing Instagram grid by previewing how posts will look before publishing.
- On the Instagram desktop app, you can only post one at a time. While, when using Hopper HQ you can bulk publish several posts onto one or various channels.
- With Hopper HQ you can work as a team. Create a team and work together throughout the whole publishing process.
- With Hopper HQ you can schedule ahead of time. Although on the Instagram desktop, you can as well, with Hopper HQ, you can use the calendar view to plan and schedule far into the future.
If you post occasionally and just need the basics, Instagram’s web version is simple and free. If you’re posting consistently, managing multiple platforms, or working with a team, Hopper HQ gives you the tools to stay organized and save hours every week.
Troubleshooting: common problems posting from desktop
Most desktop-posting friction comes down to five things. Quick fixes for each:
Why is the “+” (Create) button missing on Instagram desktop?
Two usual causes. First, you’re on a mobile device: the desktop-only Create button appears only when the browser is at desktop-width. On a phone or tablet, Instagram falls back to the mobile web experience which is intentionally read-only. Second, you’re logged out or hitting a caching issue: fully sign out, clear cookies for instagram.com, and log back in. If it still doesn’t appear, try an Incognito/Private window.
Why won’t my video upload from desktop?
Instagram accepts MP4 and MOV video, up to 60 minutes long and roughly 3.6 GB per file. If the upload stalls, check: file type (convert AVI/WMV/MKV to MP4 first), file size, aspect ratio (Instagram prefers 9:16 for Reels/Stories and 1:1 or 4:5 for feed video), and browser version. Chrome and Firefox on their current stable release are the most reliable; older browser builds are the most common cause of silent upload failures.
What are the image and video limits for Instagram desktop uploads?
- Photos: JPG or PNG, up to 30 MB per image, recommended 1080 px on the shortest side.
- Feed video: MP4 or MOV, up to 60 minutes, up to 3.6 GB.
- Reels: 9:16 aspect ratio, 3 seconds to 90 seconds, up to 4 GB.
- Stories: 9:16, up to 60 seconds per Story segment.
- Carousels: up to 10 photos or videos per post.
Full breakdown per format in our Instagram dimensions guide.
Why can’t I post a carousel from desktop?
You can. When you upload the first file, look for the small “Select multiple” icon at the bottom-right of the preview (it looks like two overlapping squares). Click it, then click each file you want in the carousel. Order the images by drag-and-drop before hitting Next.
Does posting from desktop reduce Instagram reach?
No. Instagram treats desktop posts the same as mobile posts. Reach is driven by content quality, timing, and engagement, not by the device you posted from. If you want data-backed timing recommendations by day and audience, our best time to post on Instagram guide is updated monthly.
Frequently Asked Questions
Can you post to Instagram from desktop?
Yes. Instagram’s web version supports posting photos, videos, Reels, and Stories from any desktop browser. No app or download needed.
How do you post on Instagram from a PC?
Log in to instagram.com, click the “+” icon in the sidebar, upload your content, add your caption, and click Share. The whole process takes about two minutes.
How do you post on Instagram from a Mac or MacBook?
The process is identical to Windows. Open instagram.com in any browser, click the Create button, upload your content, and publish.
Can you upload videos and Reels from desktop?
Yes. Both videos and Reels follow the same upload flow as a standard post. Click the Create button, select your video file, add your caption, and share.
Can you post Instagram Stories from a computer?
Yes. Instagram’s desktop browser now supports Story creation. Some advanced editing features are more limited than on mobile, but for straightforward Stories, the web version works well.
What is the simplest way to post to Instagram from a computer?
For a one-off post, instagram.com is simplest. For consistent posting and scheduling, Hopper HQ lets you plan a full week of content in one desktop session.
How do I schedule Instagram posts from my desktop?
Two ways. Instagram’s native scheduler (for Business and Creator accounts) lets you schedule from instagram.com. For more control, bulk scheduling, visual grid preview, and multi-platform publishing, Hopper HQ provides a complete desktop scheduling workflow.
Does posting from desktop affect Instagram reach?
No. Instagram treats desktop posts the same as mobile posts. Your reach is driven by content quality, posting consistency, and engagement, not the device you used to publish.
Posting from desktop is now simple and straightforward. With scheduling, you can plan a full week of content in a single focused session instead of posting one photo at a time from your phone. If you want to take it further, Hopper HQ’s free trial gives you everything you need to batch your content, maintain a cohesive feed, and auto-publish to Instagram from your desktop. Start your free 14-day trial.
Take your social game further with Hopper HQ.
Plan, schedule and auto-post to every channel in one place. Free for 14 days, no card required.